NativeImage Reverse Engineering
Restoring and protecting Java code is an old and often-discussed issue. Due to the byte-code format used to store Java class files, which contains a lot of meta-information, it can be easily restored to its original code. In order to protect Java code, the industry has adopted many methods, such as obfuscation, bytecode encryption, JNI protection, and so on. However, regardless of the method used, there are still ways and means to crack it.
Binary compilation has always been considered as a relatively effective method of code protection. Java’s binary compilation is supported as AOT (Ahead of Time) technology, which means pre-compilation.
However, due to the dynamic nature of the Java language, binary compilation needs to handle issues such as reflection, dynamic proxy, JNI loading, etc., which poses many difficulties. Therefore, for a long time, there has been a lack of a mature, reliable, and adaptable tool for AOT compilation in Java that can be widely applied in production environments. (There used to be a tool called Excelsior JET, but it seems to have been discontinued now.)
In May 2019, Oracle released GraalVM 19.0, a multi-language supporting virtual machine, which was its first production-ready version. GraalVM provides a NativeImage tool that can achieve AOT compilation of Java programs. After several years of development, NativeImage is now very mature, and SpringBoot 3.0 can use it to compile the entire SpringBoot project into an executable file. The compiled file has fast startup speed, low memory usage, and excellent performance.
So, for Java programs that have entered the era of binary compilation, is their code still as easily reversible as it was in the bytecode era? What are the characteristics of the binary files compiled by NativeImage, and is the intensity of binary compilation sufficient to protect important code?
To explore these issues, we recently developed a NativeImage analysis tool, which has achieved a certain degree of reverse effect.
Project
https://github.com/vlinx-io/NativeImageAnalyzer
Generating NativeImage
First, we need to generate a NativeImage. NativeImage comes from GraalVM. To download GraalVM, go to https://www.graalvm.org/ and download the version for Java 17. After downloading, set the environment variable. Since GraalVM contains a JDK, you can directly use it to execute the java command.
Add $GRAALVM_HOME/bin to the environment variable, and then execute the following command to install the native-image tool
gu install native-image
A simple Java program
Write a simple Java program, for example:
public class Hello {
	public static void main(String[] args){
		System.out.println("Hello World!");
	}
}
Compile and run the above Java program:
javac Hello.java
java -cp . Hello
You will get the following output:
Hello World!
Preparation for Compilation Environment
If you are a Windows user, you need to install Visual Studio first. If you are a Linux or macOS user, you need to install tools like gcc and clang beforehand.
For Windows users, you need to set up the environment variable for Visual Studio before executing the native-image command. You can set it up using the following command:
"C:\Program Files (x86)\Microsoft Visual Studio\2017\Community\VC\Auxiliary\Build\vcvars64.bat"
If the installation path and version of Visual Studio are different, please adjust the related path information accordingly.
Compile with native-image
Now use the native-image command to compile the above Java program into a binary file. The format of the native-image command is the same as the java command format, and it also has-cp, -jarThese parameters, how to use the java command to execute the program, use the same method for binary compilation, just replace the command from java with native-image. Execute the command as follows
native-image -cp . Hello
After a period of compilation, it may consume more CPU and memory. You can get a compiled binary file, and the output file name is default to the lowercase of the main class name, which is "hello" in this case. If it is under Windows, it will be "hello.exe". Use the "file" command to check the type of this file, you can see that it is indeed a binary file.
file hello
hello: Mach-O 64-bit executable x86_64
Execute this file, and its output will be the same as the one obtained in the previous use.java -cp . HelloThe result is consistent
Hello World!
Analyzing NativeImage
Analyzing with IDA
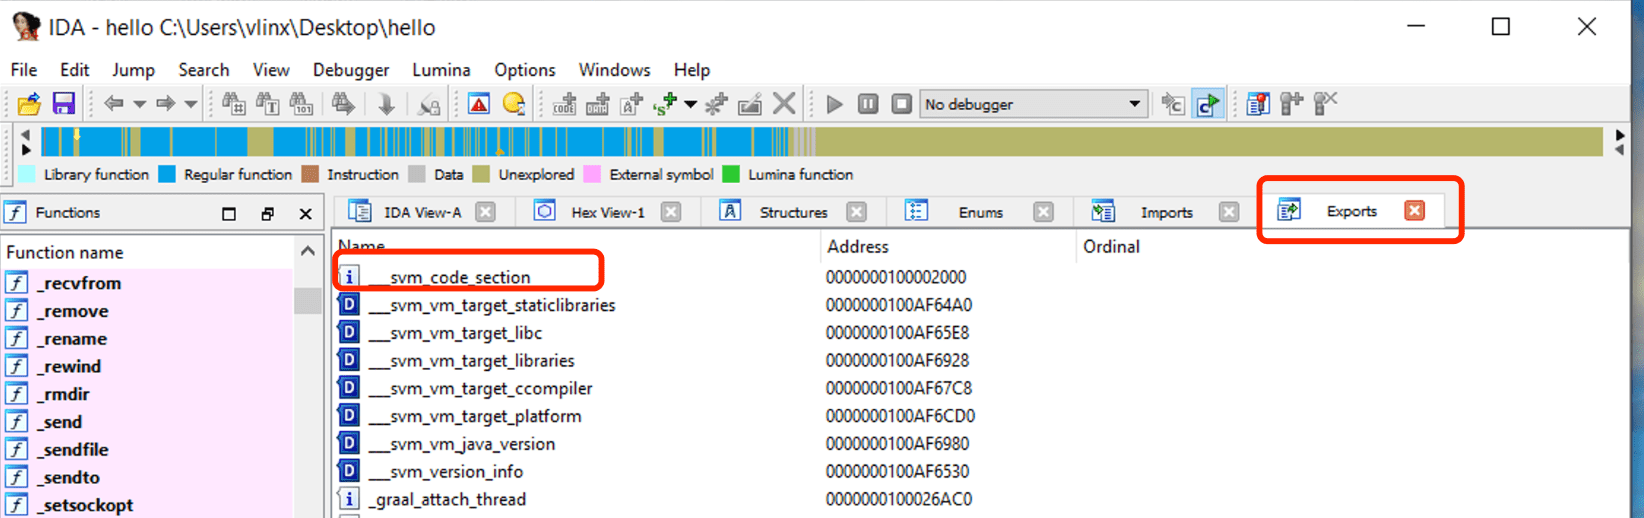
Use IDA to open the compiled hello from the above steps, click on Exports to view the symbol table, you can see the symbol svm_code_section, and its address is the entry address of the Java Main function.
Navigate to this address to view the assembly code
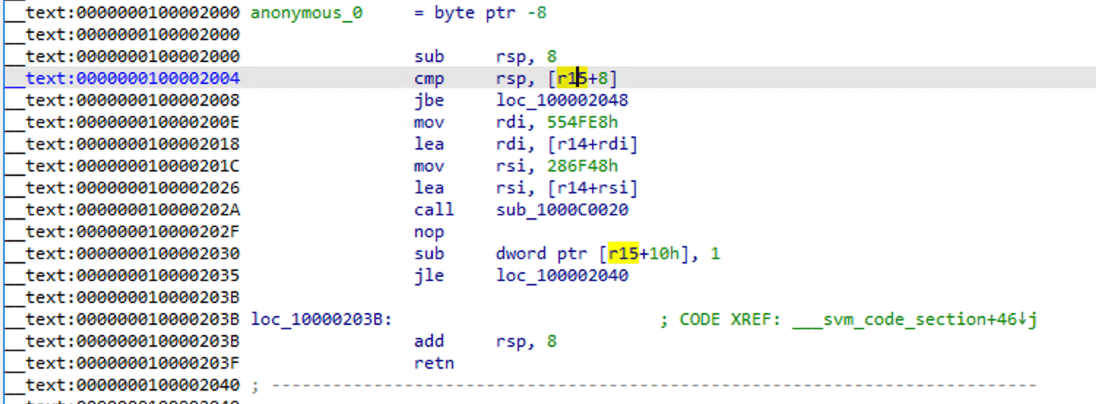
You can see that it has become a standard assembly function, use F5 to decompile
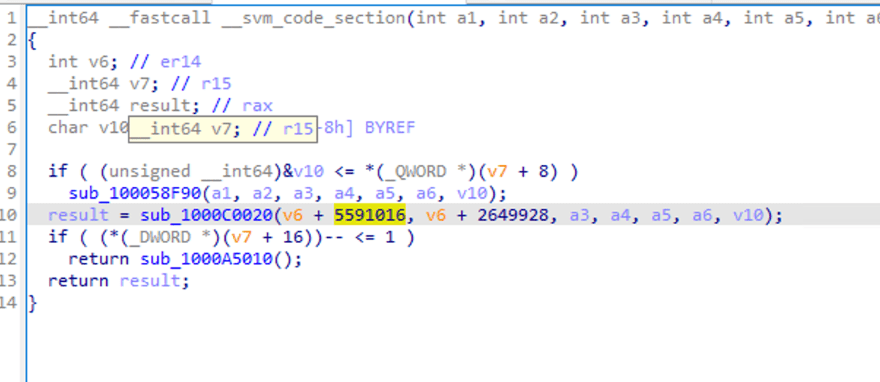
Some function calls can be seen, and some parameters are passed, but it is not easy to see the logic.
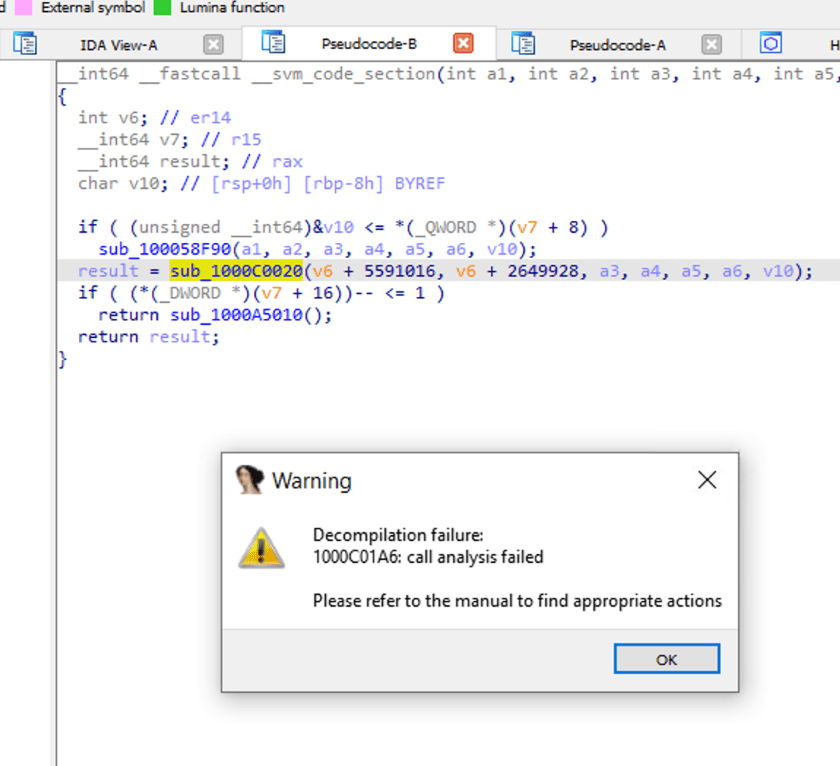
When we double-click sub_1000C0020, let's take a look inside the function call. IDA prompts analysis failure.
Decompilation Logic of NativeImage
Because the compilation of NativeImage is based on JVM compilation, it can also be understood as enclosing binary code with a layer of VM protection. Therefore, tools like IDA are unable to reverse-engineer it well in the absence of corresponding information and targeted processing measures.
However, regardless of the format, be it bytecode or binary form, some basic elements of JVM execution are bound to exist, such as class information, field information, function invocation, and parameter passing. Based on this mindset, the analysis tool I have developed can achieve a certain level of restoration effect and, with further improvement, have the ability to achieve a high level of restoration accuracy.
使用NativeImageAnalyzer进行分析
Visit https://github.com/vlinx-io/NativeImageAnalyzer to download NativeImageAnalyzer
Execute the following command for reverse analysis, currently only analyzing the Main function of the main class
native-image-analyzer hello
The output is as follows
java.io.PrintStream.writeln(java.io.PrintStream@0x554fe8, "Hello World!", rcx)
return
Let's take a look at the original code again.
public static void main(String[] args){
		System.out.println("Hello World!");
}
Now let's take a look at the definition of System.out.
public static final PrintStream out = null;
You can see that the 'out' variable of the System class is a variable of type PrintStream, and it is a static variable. During compilation, NativeImage directly compiles an instance of this class into a region called Heap, and the binary code directly retrieves this instance from the Heap region for invocation. Let's take a look at the original code after restoration.
java.io.PrintStream.writeln(java.io.PrintStream@0x554fe8, "Hello World!", rcx)
return
These java.io.PrintStream@0x554fe8 It's just read from the Heap area java.io.PrintStream The instance variable is located at the memory address 0x554fe8.
我们再来看下java.io.PrintStream.writeln 函数的定义
private void writeln(String s) {
		......
}
Here we can see that there is a String argument in the writelin function, but in the restored code, why are there three arguments passed? First writeln is a class member method that hides only one this, The variable points to the caller, which is the first parameter passed, java.io.PrintStream@0x554fe8 As for the third parameter rcx, it is because during the process of analyzing the assembly code, it was determined that this function was called with three parameters. However, upon examining the definition, we know that this function actually only calls two parameters. This is also an area that needs improvement for this tool in the future.
A more complex program
We will now analyze a more complex program, such as calculating a Fibonacci sequence, with the following code
class Fibonacci {
    public static void main(String[] args) {
        int count = Integer.parseInt(args[0]);

        int n1 = 0, n2 = 1, n3;
        System.out.print(n1 + " " + n2);

        for (int i = 2; i < count; ++i){
            n3 = n1 + n2;
            System.out.print(" " + n3);
            n1 = n2;
            n2 = n3;
        }
        System.out.println();
    }
}
Compile and execute
javac Fibonacci.java
native-image -cp . Fibonacci
./fibonacci 10
0 1 1 2 3 5 8 13 21 34
The code obtained after restoration using NativeImageAnalyzer is as follows
rdi = rdi[0]
ret_0 = java.lang.Integer.parseInt(rdi, 10)
sp_0x44 = ret_0
ret_1 = java.lang.StringConcatHelper.mix(1, 1)
ret_2 = java.lang.StringConcatHelper.mix(ret_1, 0)
sp_0x20 = java.io.PrintStream@0x554fe8
sp_0x18 = Class{[B}_1
tlab_0 = Class{[B}_1
tlab_0.length = ret_2<<ret_2>>32
sp_0x10 = tlab_0
ret_28 = ?java.lang.StringConcatHelper.prepend(tlab_0, " ", ret_2)
ret_29 = java.lang.StringConcatHelper.prepend(ret_28, sp_0x10, 0)
ret_30 = ?java.lang.StringConcatHelper.newString(sp_0x10, ret_29)
java.io.PrintStream.write(sp_0x20, ret_30)
if(sp_0x44>=3)
{
	ret_7 = java.lang.StringConcatHelper.mix(1, 1)
	tlab_1 = sp_0x18
	tlab_1.length = ret_7<<ret_7>>32
	sp_0x10 = " "
	sp_0x8 = tlab_1
	ret_22 = ?java.lang.StringConcatHelper.prepend(tlab_1, " ", ret_7)
	ret_23 = ?java.lang.StringConcatHelper.newString(sp_0x8, ret_22)
	rsi = ret_23
	java.io.PrintStream.write(sp_0x20, ret_23)
	rdi = 1
	rdx = 1
	rcx = 3
	while(true)
	{
		if(sp_0x44<=rcx)
		{
			break
		}
		else
		{
			sp_0x34 = rcx
			rdi = rdi+rdx
			r9 = rdi
			sp_0x30 = rdx
			sp_0x2c = r9
			ret_11 = java.lang.StringConcatHelper.mix(1, r9)
			tlab_2 = sp_0x18
			tlab_2.length = ret_11<<ret_11>>32
			sp_0x8 = tlab_2
			ret_17 = ?java.lang.StringConcatHelper.prepend(tlab_2, sp_0x10, ret_11)
			ret_18 = ?java.lang.StringConcatHelper.newString(sp_0x8, ret_17)
			rsi = ret_18
			java.io.PrintStream.write(sp_0x20, ret_18)
			rcx = sp_0x34+1
			rdi = sp_0x30
			rdx = sp_0x2c
		}
	}
}
java.io.PrintStream.newLine(sp_0x20, rsi)
return
Compare the restored code with the original code.
rdi = rdi[0]
ret_0 = java.lang.Integer.parseInt(rdi, 10)
sp_0x44 = ret_0
The corresponding is
int count = Integer.parseInt(args[0]);
rdi is the register used to pass the first argument of a function, if it is Windows, then rdi = rdi[0], which corresponds to args[0],Afterwards, call java.lang.Integer.parseInt to parse and obtain an int value, then assign the return value to a stack variable sp_0x44.
int n1 = 0, n2 = 1, n3;
System.out.print(n1 + " " + n2);
Corresponding to.
ret_1 = java.lang.StringConcatHelper.mix(1, 1)
ret_2 = java.lang.StringConcatHelper.mix(ret_1, 0)
sp_0x20 = java.io.PrintStream@0x554fe8
sp_0x18 = Class{[B}_1
tlab_0 = Class{[B}_1
tlab_0.length = ret_2<<ret_2>>32
sp_0x10 = tlab_0
ret_28 = ?java.lang.StringConcatHelper.prepend(tlab_0, " ", ret_2)
ret_29 = java.lang.StringConcatHelper.prepend(ret_28, sp_0x10, 0)
ret_30 = ?java.lang.StringConcatHelper.newString(sp_0x10, ret_29)
java.io.PrintStream.write(sp_0x20, ret_30)
In our Java code, the simple string concatenation operation is actually converted to three function calls: StringConcatHelper.mix, StringConcatHelper.prepend, and StringConcatHelper.newString. Among them, StringConcatHelper.mix calculates the length of the concatenated string, StringConcatHelper.prepend combines the byte[] array that carries the specific string content together, and StringConcatHelper.newString generates a new String object from the byte[] array.
In the above code, we see two types of variable names, sp_0x18 and tlab_0. Variables starting with sp_ indicate variables allocated on the stack, while variables starting with tlab_ indicate variables allocated on Thread Local Allocation Buffers. This is just an explanation of the origin of these two types of variable names. In the restored code, there is no distinction between these two types of variables. For information related to Thread Local Allocation Buffers, please search for it yourself.
Here we assign tlab_0 to Class{[B}_1. The meaning of Class{[B}_1 is an instance of the byte[] type. [B represents the Java descriptor for byte[], _1 indicates that it is the first variable of this type. If there are subsequent variables defined for the corresponding type, the index will increase accordingly, such as Class{[B]}_2, Class{[B]}_3, etc. The same representation applies to other types, such as Class{java.lang.String}_1, Class{java.util.HashMap}_2, and so on.
The logic of the above code explains simply creating a byte[] array instance and assigning it to tlab0. The length of the array is ret_2 << ret_2 >> 32. The reason why the length of the array is ret_2 << ret_2 >> 32 is because when calculating the length of a String, it needs to convert the length of the array based on encoding. You can refer to relevant code in java.lang.String.java. Next, prepend function combines 0, 1, and spaces into tlab0, then generates a new String object ret_30 from tlab_0 and passes it to java.io.PrintStream.write function for printing output. Actually, here the parameters restored by prepend function are not very accurate and their positions are also incorrect. This is an area that needs further improvement later on.
After converting the two lines of Java code into actual execution logic, it is still quite complex. In the future, it can be simplified by analyzing and integrating on the basis of the currently restored code.
Continue walking forward
for (int i = 2; i < count; ++i){
  	n3 = n1 + n2;
  	System.out.print(" " + n3);
  	n1 = n2;
  	n2 = n3;
}
System.out.println();
The corresponding is
if(sp_0x44>=3)
{
	ret_7 = java.lang.StringConcatHelper.mix(1, 1)
	tlab_1 = sp_0x18
	tlab_1.length = ret_7<<ret_7>>32
	sp_0x10 = " "
	sp_0x8 = tlab_1
	ret_22 = ?java.lang.StringConcatHelper.prepend(tlab_1, " ", ret_7)
	ret_23 = ?java.lang.StringConcatHelper.newString(sp_0x8, ret_22)
	rsi = ret_23
	java.io.PrintStream.write(sp_0x20, ret_23)
	rdi = 1
	rdx = 1
	rcx = 3
	while(true)
	{
		if(sp_0x44<=rcx)
		{
			break
		}
		else
		{
			sp_0x34 = rcx
			rdi = rdi+rdx
			r9 = rdi
			sp_0x30 = rdx
			sp_0x2c = r9
			ret_11 = java.lang.StringConcatHelper.mix(1, r9)
			tlab_2 = sp_0x18
			tlab_2.length = ret_11<<ret_11>>32
			sp_0x8 = tlab_2
			ret_17 = ?java.lang.StringConcatHelper.prepend(tlab_2, sp_0x10, ret_11)
			ret_18 = ?java.lang.StringConcatHelper.newString(sp_0x8, ret_17)
			rsi = ret_18
			java.io.PrintStream.write(sp_0x20, ret_18)
			rcx = sp_0x34+1
			rdi = sp_0x30
			rdx = sp_0x2c
		}
	}
}
java.io.PrintStream.newLine(sp_0x20, rsi)
return
sp_0x44 is the parameter we input to the program, which is count. The for loop in the Java code will only be executed if count >= 3. Here, the for loop is transformed back into a while loop, essentially having the same semantics. Outside of the while loop, the program executes logic where count=3. If count <= 3, the program completes execution and will not enter the while loop again. This may also be an optimization done by GraalVM during compilation.
Let's take a look at the exit condition of the loop again.
if(sp_0x44<=rcx)
{
		break
}
This corresponds to
i < count
At the same time, rcx is also accumulating during each iteration process.
sp_0x34 = rcx
rcx = sp_0x34+1
corresponds to
++i
Next, let's take a look at how the logic of adding numbers in the loop body is reflected in the restored code. The original code is as follows:
for(......){
	......
  n3 = n1 + n2;
	n1 = n2;
	n2 = n3;
  ......
}
The code after restoration is
while(true){
	......
  rdi = rdi+rdx 	-> n3 = n1 + n2
  r9 = rdi				-> r9 = n3
  sp_0x30 = rdx		-> sp_0x30 = n2
  sp_0x2c = r9		-> sp_0x2c = n3
  rdi = sp_0x30 	-> n1 = sp_0x30 = n2
  rdx = sp_0x2c		-> n2 = sp_0x2c = n3
  ......
}
The other code in the loop body performs string concatenation and output operations as before. The restored code basically reflects the execution logic of the original code.
Further improvements are needed
Currently, this tool is able to partially restore program control flow, achieve some level of data flow analysis and function name restoration. To become a complete and usable tool, it still needs to accomplish the following:
More accurate function name, function parameters, and function return value restoration
Accurate object information and field restoration
More accurate expression and object type inference
Statement Integration and Simplification
Thoughts on binary protection
The purpose of this project is to explore the feasibility of reverse engineering NativeImage. Based on current achievements, it is feasible to reverse engineer NativeImage, which also brings higher challenges to code protection. Many developers believe that compiling software into binaries can guarantee security, neglecting the protection of binary code. For software written in C/C++, many tools such as IDA already have excellent reverse engineering effects, sometimes even exposing more information than Java programs. I have even seen some software distributed in binary form without removing symbol information of function names, which is equivalent to running naked.
Any code is composed of logic. As long as it contains logic, it is possible to restore its logic through reverse means. The only difference lies in the difficulty of restoration. Code protection is to maximize the difficulty of such restoration.